QuicKit #1: Fuel Tank Stand (HO)
$19.00
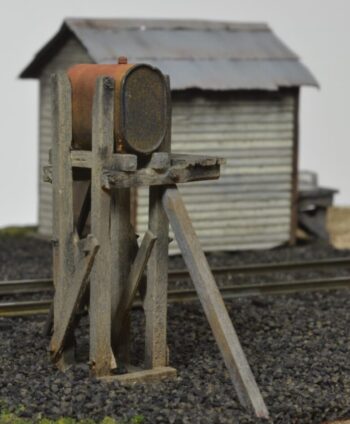
Fuel oil or kerosene was often used by caboose crews for heating, cooking, lamps, marker lights and other uses. To replenish the fuel at the end of a freight run a fuel tank was often placed near the caboose track. This small HO scale structure can be located just about anywhere in the yard. It can also be used in a variety of other settings on your pike such as a way station, industrial building or anywhere fuel might be needed. This is a quality craftsman kit with thorough instructions that are amply illustrated. Click here for QuicKit pictures or “how-to” videos.
This kit includes scale wood for the stand, ladder, brass tank with spigot and rivets for the bracing. Footprint is 1.25″ x 1.25″.
In stock


Dan –
I wanted to share a couple pics of the kit I purchased Sunday at Berea. Great kit and I will be ordering a bigger kit come winter.
Michael –
Got three of your Quick Kits (#1, #2, and #3) from my wife for Christmas. Just getting started on the first one (Fuel Tank Stand), and I’m very impressed. The video is helpful, and your printed instructions are very detailed, especially for a kit this small. Also, I’m impressed with your packaging; nothing will get broken in this much packaging. Keep up the good work, especially for us steam fanatics!
Bob –
How do you get that realistic rust look?
admin –
Hi Bob, I use weathering chalks applied with a flat brush. First, brush on (from the top down) a light rust color, like a light orange. Draw it down the side as far as you’d like. Next, brush on a medium rust color and pull it down the sides, but not as far. Finally, using a dark rust color, put some on the top and pull it slightly down the sides. This gives a great layered look to the rust. If you’re not happy with the look, wash it off and try again. You may wan to practice on a scrap of paper first. Studying some rust pictures on the net can help also.
Scott –
Jim, I can’t get the valve to glue in the dimple on the tank; it just falls off. Any ideas?
Scott
admin –
Scott,
You have to drill a hole in the tank for the valve. Select a drill bit that is slightly larger than the valve stem and carefully drill a hole into the tank. This will take a few minutes since it’s solid brass. I used a small, hobby hand drill. Once the hole is deep enough, put a drop of CA in the hole, slide the valve into it, and align it so the spigot is pointing down with the valve handle on top. The close up pictures on the site show how to position it.
JL –
Nice to see your new quick kit line!
I got the first one, the fuel stand, and it went together in 2 evenings. It was pretty fast with the pre-cut wood – thanks for that.
I may pass on the coal bin, but what’s coming up next?
admin –
Thanks JL.
I’ve got a couple new ones in the pipeline for this fall – the flag and lantern stand from the limited-production Kit #2 (Caboose Services) and an outbuilding that will have multiple uses on a layout.
First, though, limited-production Kit #3, Pete’s Freight Dock, will be out soon.
Thanks for your comments!
Jim
The TrainMaster